Sunday, October 30, 2011

How To Build A Shirt

      Have you ever been to "Build a Bear"? Don't go unless you want to have the most expensive stuffed toy you've ever seen in your life...but its a very fun concept and kids love it! While I was working on this post, I was thinking how fun it would be to have "Build a Wardrobe" store...I mean, how stupendous would it be to walk in, pick out what fabric you want, what piece of clothing you want, how you want it styled and accessorized and have them do it right there in front you?! Somebody out there needs to work on that idea, seriously. All righty, before the good idea train falls off the track into a ravine and burns, lets get back to the original topic.
     I'm going to show you how to make a shirt without any pattern or using any other piece of clothing as a pattern. Normally, when I make things, I'll throw down a shirt or whatever on my fabric to use as a general guide. This doesn't work however, if I want to do a something in a different size than I am. It also doesn't work if I want to make something that is quite different than anything I already own. If I know what "makes" a shirt (or whatever garment) work, than I can make whatever style my little heart desires.
       So, here is the concept. To do a shirt, you need to know the measurement of the widest part (chest or tummy) of your torso. Once you have that measurement, add about two inches. (If you are using a non stretchy material you will probably need to add three or four inches.) Cut a square of fabric as wide as that measurement, and as long as you want the shirt to be. (Don't forget you need two of everything, two sides of the shirt, two sleeves, etc.)


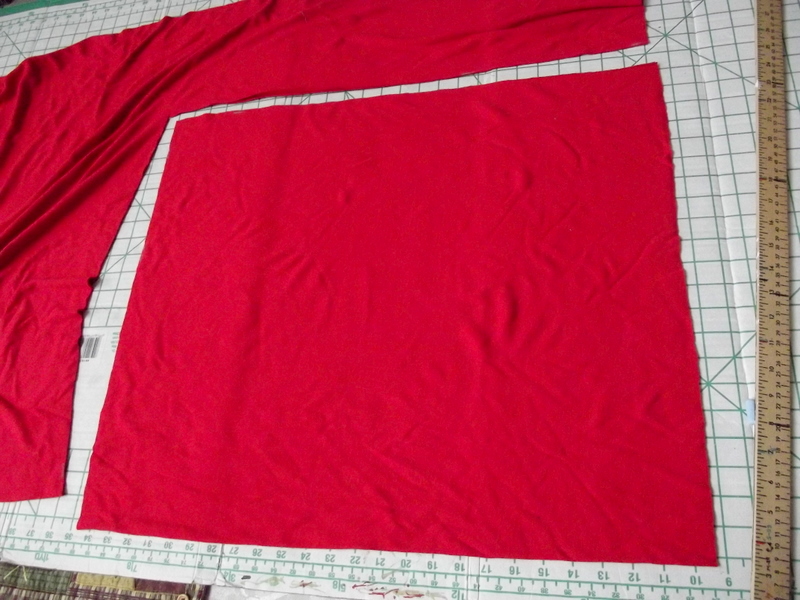
        Now, a shirt needs shape obviously, so fold your square in half. I wanted a shirt with looser sleeves and a boat neck, so, I cut to fit my idea. I measured down the side ten inches and across the top two inches. I cut that out in an arch.


      Now, for the neck, I measured across the top two inches, and down the fold four inches. I cut that out and now it looks more like a shirt! (you probably want to cut the front slightly lower than the back)


      Now I "build" the rest of my shirt based on this foundation. I use the arm hole of my shirt to determine the sleeve. The sleeve has to be cut on the fold. It looks like this.


       I wanted binding on the sleeves, a band around the waist, and a chunky collar, so, I again, used the existing pieces to determine what to cut. The sleeve binding is cut on the fold, just like the sleeve.


      I used the bottom of the shirt to determine the band.


     I like to stretch out the neckline against a yardstick to get an estimate of how long to cut the collar, or neck binding.


      One thing to know, if you cut the neck binding the same width at your neck it will be loose. If you cut it shorter and stretch it to match the neck as you sew, it will lay flat and tight. It all depends on the look you are wanting.
      Sew it all together and you've built yourself a shirt!


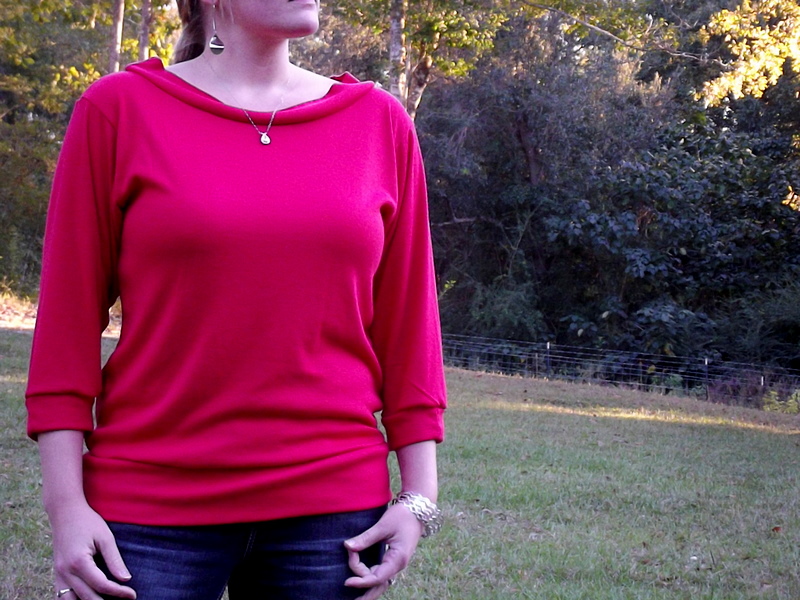
      If you get that first bit right, the actual shirt part, then you will be able to figure out all the rest of the pieces. It will all fit together just like a puzzle. I did a few that I will be listing in my Etsy shop later this week. I personally find this style very comfy, and nice for cooler weather.


       This method also works for dresses. Just remember when doing dresses, you have make sure you have enough ease around the hips. I did the exact same style on this dress. (one of these will also being going in the Etsy shop later this week) The neck on this one is much tighter, so it lays flat. A floppy neck would look odd on this style dress.


     So there you go. Using that concept, you can make any style you wish. Don't get too hung up on using patterns. Patterns are just measurements with lines drawn after all. That being said, it probably wouldn't hurt for me to learn to use one now and then! =)

Deuteronomy 6:5 And thou shalt love the LORD thy God with all thine heart, and with all thy soul, and with all thy might.

Linking to:
Singing Three Little Birds
The Southern Institute
Not Just a Houswife
Sugar Bee Crafts
Home Stories A to Z
Chef in Training
Running with Glitter
My Girlish Whims
Simple Home Life

Thursday, October 27, 2011

Sweater Dresses and the Dangers of Sewing

      We have a had a few brief snaps of cold (ish) weather around here, and it has put me on a winter wardrobe kick. My toddler still has the waist size of a 12-18 month old but the length of an almost 3 year old...so that poses a real problem for finding clothes to fit the child. We do a lot of dresses and leggings, but I really need to make or alter some pants to fit her before the weather turns cold for keeps.When I saw this tutorial from Make it and Love it the other day, it reminded me I had thrifted a few sweaters last year to make into little girl dresses, and had never got around to doing it. Her tutorial is super good, so I didn't take pictures along the way when I did it. The basic idea is to use as much of the finished edges on the original sweater as possible when you resize it.
     I didn't take a picture of my sweaters to start with (I know, bad blogger!). One was just a basic, short sleeve, white sweater, and the other was a long sleeve cream colored sweater. I used the white one to make this dress for the toddler.


     It has a draw string (I just used ribbon) neckline, and a peasant style cut. Here is a vary candid, unprofessional shot of my model.


      I used the cream colored one to make the baby's. It has regular sleeves, a chunky neck, gathered skirt, and a little belt to finish it off.


      These are super simple to do, and great way to use up old sweaters. I think I might see if I can find some more colors to do more for them. I think sweater dresses are so cute!
       So why is sewing dangerous you may be wondering? Well, let me just tell you! While I was working on these, I dropped my pin cushion on the floor and forgot about it. I ended up stepping on it at just the right angle and managed to drive a sewing needle up my foot! Half of it broke off in my foot with just a tiny bit sticking out. I tried to get it out with tweezers, but they weren't strong enough. I grabbed some needle nose pliers and that did the trick for me. Lest you think I exaggerate, here is the proof.


     I'm slightly traumatized, but I think I'll recover. Let that be a lesson to you, wear proper foot protection when sewing! (Ha! I'm sure I won't be trading my flip flops in anytime soon!)
      Anyway, go check out that tutorial and have fun!

Deuteronomy 7:9 Know therefore that the LORD thy God, he is God, the faithful God, which keepeth covenant and mercy with them that love him and keep his commandments to a thousand generations;

Tuesday, October 25, 2011

Trying to cut down your grocery bill?

       Let my just tell you, I despise grocery shopping. Not only is it intensely annoying to try to fit kids and groceries in the cart,but it is also intensely annoying to spend ridiculous amounts of money on a boring thing like food and basic supplies. And, let me just tell you, I am no good at couponing. (is that even a word?) It requires time and organization, of which, I have neither. Even when I do manage to scrounge up a few coupons, I forget to use them, or they have some reason in small black writing why it doesn't apply to my purchase. Maybe I should take a class on it, or maybe I'm just a coupon simpleton.
      Anyway, however lacking my coupon skills are, I do know how to boil water...and that my dears, will save you money on your grocery bill. How? Make your own laundry soap!


     I get all of that soap for about ten minutes worth of work and only a couple dollars! You can find the recipe here. Really, if I can do it, I'm fairly sure you can too.
Have a happy Monday!

Deuteronomy 6:5 And thou shalt love the LORD thy God with all thine heart, and with all thy soul, and with all thy might.

Thursday, October 20, 2011

A few interesting reads

     There are some interesting topics being addressed right now at a few different blogs. Here are the links in case they apply to you at all and you're interested.

Funky Junk Interiors is doing a thirty one day series on how to turn your blog into a business.

Ameroonie Designs has a couple really helpful articles about selling at craft shows.

All Things Thrifty has a blogger behind the blog series going on. They are full of a lot of helpful information.

      I've really enjoyed reading these and just wanted to pass them along. Happy Thursday!

Psalms 119:165 Great peace have they which love thy law: and nothing shall offend them.

Tuesday, October 18, 2011

Sewing tips - Slits

       I recently made a few skirts with slits in the side seams. I thought I'd show you my super easy way of making them. They are very simple to do and give a garment a slightly more professional look. I'm going to skip right to the slit sewing and assume you know how to cut out a basic straight skirt.
      I started by serging the edges of my two panels. I measured down to where I wanted the slit to start and put a pin.


     I sewed the two panels together leaving about a fourth inch on the side.


      I stopped when I got the pin and it looked like this.

      I laid the serged edges flat and sewed them down. ( I switched to a short skirt on the pictures here so don't be confused)

      Once both edges are sewn down, sew a line horizontally across the top of the slit. This helps the fabric have extra stability at that weak spot.


      After hemming the bottom, I have a nice and tidy slit. It is the exact same concept you use when sewing in a zipper.


     These small slits are more for decorative purposes in this short skirt than for function.


     In a long one like this though, they are very functionable. They make it so you don't have to take mini steps when you walk.


      For someone with long legs, like me, they are almost essential. Unless it is a very full skirt, I am almost guaranteed to rip a seam when I walk too fast without them.


      So there you go, give it a try and you'll probably find you like them!

Psalms 145:18 The LORD is nigh unto all them that call upon him, to all that call upon him in truth.

Linking to:
My Girlish Whims
Frugalicious Me

Monday, October 17, 2011

I heart Grey

      I tend to go on color kicks. This summer I was infatuated with everything turquoise and yellow. Now I've moved on to the color grey. I think its a classy color. Can colors be classy? I say yes. It looks so lovely with almost any other color, especially pastels. I. just. love. it.
My latest use of grey was this skirt. I bought the fabric ages ago and finally used it to make a quick skirt. This fabric really makes me happy, it has all my favorites...circles, stripes, grey, white and yellow. It drapes so well too!


        Off topic, but this style skirt is the quickest ever to make. I just use super stretchy spandex type fabric for the waist band. You can see it peeking out here (albeit slightly wrinkled).


        Here's a few more of my latest uses of grey.
       Short shirred, grey geometric print skirt for my Etsy shop.


      Ruffled grey scarf...tutorial found here.


     Satin sash bag...tutorial found here.


     A simple grey circle skirt with elastic waist band...because I need another grey skirt like a hole in my head.

       And, just for the record, I'm really loving these grey boots if anyone wants to donate to the "Abby needs outrageously priced boots" fund.

     Anyone else go through fits of color obsessions regularly? Don't be surprised if you see a new color scheme on the old blog here pretty soon! =)
     I've got some fun sewing tutorials in the works and the weather has been gorgeous here lately so lots of painting projects coming soon too! I need more hours in the day!
    

Psalms 65:9 Thou visitest the earth, and waterest it: thou greatly enrichest it with the river of God, which is full of water: thou preparest them corn, when thou hast so provided for it. 

Tuesday, October 11, 2011

Kitchen Cabinet Doors Look Nicer in Bedrooms

       Really, they do, I'm not lying. The builder who built this house left a kitchen cabinet door sample up in the attic. I needed something other than a Ziploc bag to store my earrings. The obvious solution being, use the free cabinet door to store my earrings and do-dads. Want to see how?
     Here is my door.


     I removed the door and was left with this.


      I cut out a square of wire. This isn't chicken wire, I think its dog kennel wire. Whatever, use kangaroo wire if you want, you just need wire.


      I stapled that with my heavy duty staple gun to the back of my door frame.


     So now it looks like this.


      Next I spray painted it white. You know, spray painting is wonderful for many reasons, but primarily because it is so uncomplicated. I can run out the door and give a spritz in between my regularly scheduled housework and at the end of the day....voila! A completed project that didn't require a large chunk of my day! Really, you should go spray paint something. You'll be a better person.
     Anyway, I added a couple hooks I had lying around to the bottom and that was it. I didn't even distress it or glaze it, might be a first for me! Here she is all decked out in all her jewels (or fake silver as the case may be)
     Please note, this was hung behind my bedroom door and the walls are very dark. The pictures are awful, so use your imagination.


      The wire stuff works perfectly for hooking earrings.


      I might scrounge around and see if I can find another hook to add to the bottom there. I'm not a big necklace collector, but I do like me some bracelets.


     I think it worked out just dandy. I had everything on hand, so it cost me a grand total of $0! Love it when that happens!

Psalms 46:10 Be still, and know that I am God:

linking to:
Kammys Korner
Not just a housewife
My Girlish Whims
Restore Interiors
Simple Home Life

Sunday, October 9, 2011

I'm a happy girl

      I'm a goal motivated gal...I like to have something to work towards. Sometimes, goals are just dreams. Sometimes goals are huge, you know, like that loosing weight goal that probably most of us have. Er hum...moving on quickly.  Dreams and goals keep me from getting stuck in a rut. I think they are great to have, as long as you don't pin your happiness on them. I try to not ever let a goal define who I am. For me, the only thing that should have that much influence is my relationship with Jesus Christ. If a goal was what defined me, I'd be quite the mess when the big "F" (failure) happened wouldn't I? I am all about a goal motivating me though. Motivation is kind of like the double chocolate fudge sundae at the end of a long sweaty run. Oh, I am so motivated there sweet pea! (except that would imply I run...which might be a bit of a stretch)
     So, why all this jibber jabber about goals? I have my Etsy Shop open! Yaaaaaay!


     It is a goal that I've had for ages and I'm tickled to pieces to have reached it. I know it is pretty small potatoes, and I may not make a cent off of it...but I'm sure having tons of fun with it so far. I mean, I actually have a legitimate reason to hoard fabric now! I plan on adding bunches of more things, so do please check back in occasionally. So why the crazy name? Well, I thought "Morning by Morning Productions Store" was a bit of a mouthful. My father in law is the mastermind behind "Abbtique". It is the combination of "Abby" and "Boutique"...hence the little slogan. "Original design (Hi! That's me!) - Boutique Style (that's the Boutique part) Get it? Its no good if you have to explain it.
     So far, I have mostly these in sizes 0-3 up to 5T.


       And bit of these.


       And some more this and that, some of which you've already seen on here. Right now it is all little girl and women's clothing, but at some point in the future, I want to add stuff for the boys in our lives too. My hubby is really pushing hard for some hunter's orange and camouflage to appear, I don't think I plan on giving him voting rights.
       I might be a little loony choosing now to reach this goal. Two month olds and two year olds aren't super great at being low maintenance, so things can get a little crazy. It's all good, my next goal is to invent a way to pump coffee intravenously...with extra sugar...and a double shot of espresso.
      So, what goals are you working on?


  Exodus 15:2 "The LORD is my strength and song, and he is become my salvation: he is my God..."
  

Wednesday, October 5, 2011

Ruffled Scarfs Made Easy


       My sister tells me I put ruffles and bows on everything...I deny that accusation...well slightly. I do tend to think most (OK, pretty much everything) things look better with a bit of a ruffle somewhere on it. As much as I like ruffles though, I don't really care for all the work it takes to make one...gathering fabric is slightly annoying to me for some reason. A super easy way to achieve a ruffle, without all the gathering nonsense, is to use elastic thread.


      Hand wind your bobbin with the elastic thread and sew straight lines. It will ruffle up as you go.


      I made these scarfs out of 12 inch wide strips of knit fabric.


     I made three lines, spaced about 3 inches apart, down them with the elastic thread.


       It gives you all sorts of ruffly goodness without any of that hand gathering work.


      I made a cowl neck variation out of, you guessed it, a circle. I sewed vertical and horizontal lines on this one.


       Elastic thread gives such a lovely texture to things.


       You can use any fabric you want, I just like knit because it is so soft.


      Enjoy! =)


1 Chronicles 16:34 O give thanks unto the LORD; for he is good; for his mercy endureth for ever.

linking to:
Home Stories A to Z
Not Just A Housewife
My Girlish Whims
Freckled Laundry
Simple Home Life